When you’re preparing to travel internationally or apply for important documents like a passport or visa, one of the most crucial aspects is getting the right photo size. It might seem like a small detail, but getting your passport and visa photos right can prevent delays or even rejections. In this article, we’ll walk you through everything you need to know about the correct size for passport and visa photos, ensuring you don’t face unnecessary hiccups in your application process.
Why Passport and Visa Photo Size Matters
You might be wondering: why is photo size so important? Well, passport and visa photos have to meet very specific criteria set by different authorities, such as the U.S. Department of State or the visa issuing authority of your destination country. These specifications are in place to ensure that photos are standardized across all applications, which helps authorities quickly and efficiently process your documents. When everyone’s photo fits the same measurements, it’s easier for immigration officers and border control personnel to verify identity, leading to faster processing times.
The uniformity of photo size also plays a critical role in security. Having all passport and visa photos standardized makes it easier for officials to detect fraudulent applications. This consistency is vital when dealing with sensitive information related to travel and international security. By ensuring that the photos meet a set size and format, authorities can more effectively protect against identity theft and other forms of manipulation.
A photo that’s too small, too large, or doesn’t meet the required specifications can lead to unnecessary delays in processing your passport or visa application. When your photo doesn’t meet the set criteria, it can create a backlog in the system, causing longer wait times and even the rejection of your application. This could result in having to reschedule appointments or provide additional documentation to complete the process.
Worse, if your photo doesn’t meet the specific requirements, you may have to retake it and resubmit your application, which could take valuable time. If you’re working under tight deadlines or have travel plans that depend on your passport or visa, this can lead to significant frustration and inconvenience. Ensuring your photo meets the exact requirements from the start is the best way to avoid these potential setbacks.
Passport Photo Size: U.S. Requirements
| Criteria | Specification | Measurement/Details | Notes | Example |
| Dimensions | Passport photo size | 2 x 2 inches (51 x 51 mm) | The photo must be square, with no borders. | Standard passport size. |
| Head Position and Size | Head height | 1 inch (25 mm) to 1 3/8 inches (35 mm) | Measure from chin to the top of the head. | The head should take up about 70-80% of the photo. |
| Eye height | 1 1/8 inches (28 mm) to 1 3/8 inches (35 mm) | The eye level must be within this range from the bottom of the photo. | Ensures facial alignment is correct. | |
| Background | Background color | Plain white or off-white | The background must be neutral, with no textures or shadows. | Simple white or light-colored background. |
| Lighting and Exposure | Lighting | Well-lit with no harsh shadows or bright spots | Avoid red-eye or overly bright photos. | Lighting should be even and natural. |
| Glasses | No reflections or glare | If glasses are worn, the eyes must be visible with no reflection. | Make sure glasses don’t obscure your eyes. | |
| Facial Expression | Expression | Neutral, no smiling or frowning | Keep mouth closed, no exaggerated expressions. | Calm and neutral face. |
| Eye openness | Both eyes must be open | Ensure eyes are clearly visible without any obstruction. | Avoid closed or partially closed eyes. |
Visa Photo Size: Common Global Requirements
- European Union (EU) Visa Photo Requirements
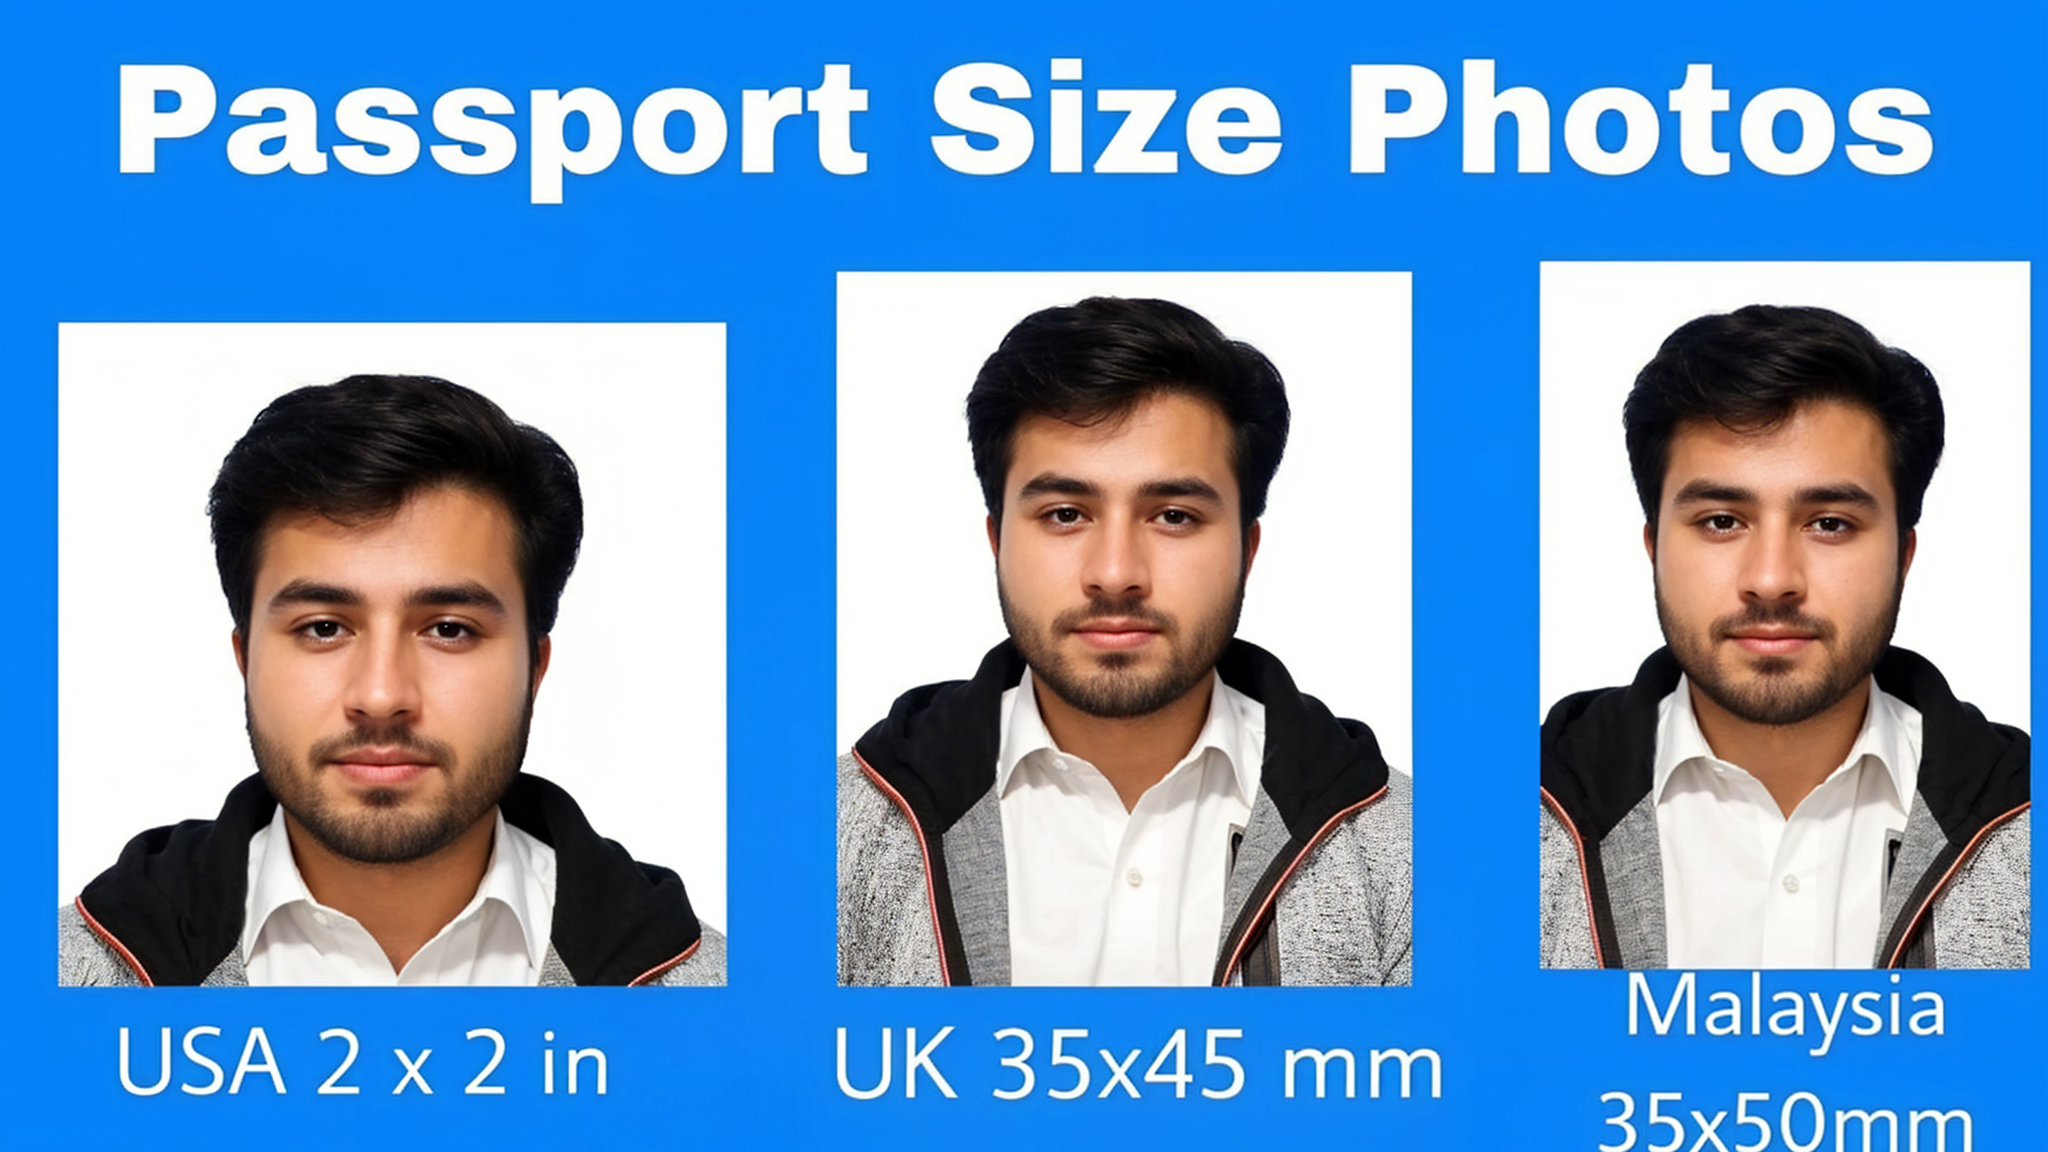
- Dimensions: 3.5 x 4.5 cm (35mm x 45mm)
- Head Size: The head should be between 32mm and 36mm in height.
- Background: A light grey or white background is required.
- K. Visa Photo Requirements
- Dimensions: 45mm x 35mm (4.5 cm x 3.5 cm)
- Head Size: The head should measure between 29mm and 34mm in height.
- Background: Plain cream or light grey.
- Schengen Area Visa Photo Requirements
- Dimensions: 3.5 x 4.5 cm (35mm x 45mm)
- Head Position: The face must be centered, with the eyes positioned between 26mm and 30mm from the bottom of the photo.
- Background: White or light-colored background.
Understanding the Passport and Visa Photo Guidelines
While each country may have slight variations in photo size and requirements, they all generally follow similar guidelines. These standards ensure consistency and security, making it easier for officials to verify your identity. Let’s break down the most important aspects of these guidelines.
First, it’s essential that your face occupies about 70-80% of the photo. This means your face should be clearly visible, without any obstruction like hair or clothing covering it. For most countries, you’ll need to be looking straight ahead in the photo, with your face centered and fully exposed. This ensures that your facial features are easily recognizable.
Secondly, accessories and hats are usually not allowed unless worn for religious reasons. If you do wear glasses, they must not cause reflections or block your eyes. This is particularly important because sunglasses or tinted glasses are strictly prohibited. The goal is to have a clear view of your eyes without any distractions. Even if you wear glasses daily, they should be removed if they obstruct the photo.
The next key guideline is maintaining a proper expression. A neutral expression is a must. You should keep your mouth closed and your eyes open, without overdoing the smile or making exaggerated facial expressions. This ensures that the photo is a true and clear representation of your natural appearance, which is crucial for identity verification.
How to Measure Passport and Visa Photo Size
| Step | Action | Tool Required | Measurement Details | Notes |
| Measure the Photo Size | Use a ruler to measure the width and height of the photo. | Ruler (in mm or inches) | Ensure the photo matches the required dimensions (e.g., 2 x 2 inches for U.S.). | Accuracy is crucial to avoid rejection of your application. |
| Check Head Size | Measure from the bottom of the chin to the top of the head. | Tape measure or ruler | Head size should be within the required range (e.g., 1 to 1 3/8 inches for U.S.). | The head should occupy 70-80% of the total photo area. |
| Ensure Face is Centered | Draw a straight line from the top of your head to the bottom of your chin. | Visual check or ruler | Your face should be centered within the frame, with no part cut off. | Alignment is important for consistent photo presentation. |
| Use Online Tools (Optional) | Use online photo cropping tools to adjust the size automatically. | Computer or smartphone | These tools adjust the photo dimensions to meet specific requirements. | Helpful for ensuring proper dimensions without manual measuring. |
| Double-Check Dimensions | Verify that all measurements align with the country-specific guidelines. | Ruler or online tool | Compare the actual measurements with the required specifications for the country. | Avoid mistakes by confirming all details before submission. |
Common Mistakes to Avoid with Passport and Visa Photos
- Incorrect Dimensions: Always double-check the required photo size for your country and make sure your photo fits those specifications.
- Poor Quality Image: Avoid blurry, pixelated, or out-of-focus photos. High resolution is key to ensuring the photo is clear and detailed.
- Wrong Background: A busy or colored background can cause your application to be rejected. Stick to a plain, light background, like white or light grey.
- Overexposure or Underexposure: Photos that are too bright or too dark will likely not be accepted. Ensure proper lighting for a balanced exposure.
- Inappropriate Clothing or Accessories: Avoid hats, glasses, or other accessories that can obscure your face, unless they are necessary for religious or medical reasons.
How to Get Your Passport or Visa Photo Taken
When it comes to getting your passport or visa photo taken, there are several options available to ensure that your photo meets the required specifications. Each method has its pros and cons, and the best choice will depend on your preferences and convenience.
One option is to visit a professional studio. Many photography studios or drug stores offer photo services specifically designed to meet the passport and visa photo guidelines. The benefit of this option is that professionals know exactly how to take the photo to fit the required size and other important guidelines. This eliminates the risk of errors and ensures your photo will be accepted without any issues. Additionally, they are equipped with the proper lighting and equipment, which can make a difference in the overall quality of the photo.
If you prefer a more hands-on approach, you can take the photo at home using a digital camera or smartphone. This method can be convenient and cost-effective, especially if you have the right equipment. Make sure to use a camera with a good resolution and set up a plain background to avoid any distractions. Proper lighting is crucial, as it will help ensure that the photo is clear and properly exposed. While this method requires a bit more effort on your part, it can be a great option if you follow the guidelines carefully.
Another convenient choice is to use online passport photo services. These websites and apps allow you to upload a selfie, which they then automatically crop and adjust to meet the specific passport and visa photo requirements. This can be an excellent solution for those who need a quick and easy way to get their photo ready. These services often provide fast turnaround times and ensure that your photo meets the necessary criteria without the hassle of manual adjustments.
Tips for Perfect Passport and Visa Photos
| Tip | Description | Why It’s Important | Additional Advice | Common Mistakes to Avoid |
| Check the Guidelines Before You Take the Photo | Always refer to the specific requirements for the country you’re applying to. | Ensures your photo meets the exact specifications for the visa or passport application. | Look up the country’s guidelines to avoid delays or rejections. | Not checking the required photo dimensions and specifications. |
| Use Natural Lighting | Natural light is often the best to avoid harsh shadows and reflections. | Soft, even lighting helps to ensure the photo is clear and well-lit without any distortion. | Position yourself near a window or in an area with plenty of natural light. | Using artificial or harsh lighting that creates shadows or overexposure. |
| Take Multiple Shots | It’s always a good idea to take several photos and pick the best one to submit. | Increases the chances of getting a perfect photo that meets all requirements. | Try different angles and lighting to ensure the best result. | Settling for the first photo taken without considering the quality. |
| Wear Simple, Neutral Clothing | Avoid clothing with patterns or colors that stand out too much. | Neutral clothing helps keep the focus on your face without distractions. | Stick to solid, dark-colored shirts or blouses. | Wearing busy patterns or brightly colored clothes that can distract from the face. |
| Get a Second Opinion | Ask someone to review your photo before submitting it to ensure it meets all requirements. | Fresh eyes can catch issues you may have missed, such as improper framing or lighting. | Have a trusted person check if everything looks correct before submission. | Not getting a second opinion and missing critical errors. |
How to Ensure Your Passport and Visa Photo Meets All Requirements
When applying for a passport or visa, it’s crucial to ensure your photo meets all the required specifications. A photo that doesn’t adhere to the guidelines can delay your application, so it’s important to get it right the first time. Here are some additional key considerations to help you achieve the perfect passport and visa photo.
- Frame Your Face Correctly
The size of your face in the photo matters. Make sure that your face takes up about 70-80% of the total photo space. This means your head and shoulders should be clearly visible, and there should be enough space around your face to avoid any cropping errors. - Keep Your Eyes Open and Visible
A common mistake many people make is closing their eyes for the photo. It’s important to keep both eyes open, with no hair or accessories obstructing them. Ensure that the eyes are fully visible and properly lit. - Avoid Smiling or Frowning
The photo should show a neutral expression with your mouth closed. You want to avoid exaggerated facial expressions that could make your photo look unnatural. A serious, relaxed expression is typically required, and any attempt to look overly cheerful can cause issues with your application. - Use the Right Background
A plain, neutral background is essential for your passport or visa photo. A light-colored, non-patterned background, usually white or light gray, helps highlight your face and prevents distractions in the photo. Avoid having shadows or objects visible in the background that could detract from the clarity of the image. - Proper Lighting Is Key
To avoid shadows or glares, use natural lighting as much as possible. Position yourself in a place with good, soft lighting that will evenly illuminate your face without creating harsh shadows. If taking the photo indoors, ensure there’s no direct light hitting your face, which can lead to overexposure. - Get the Right Dimensions and Proportions
It’s easy to overlook the size specifications, but this is critical. Check the specific size requirements for your country’s passport or visa photo before taking it. Different countries might have slightly different standards, so make sure you’re aware of the precise dimensions, head position, and other photo-related requirements.